
Laravel is a widely-used, open-source PHP web application framework. One of its many strengths is how it handles authentication. Authentication is crucial in web development as it is used to establish a user's identity before granting access to protected resources within an application. Laravel provides an elegant and simple way to handle authentication, which is not only secure but also customizable. In this article, we will walk through the steps to manually register a new user in a Laravel application using Laravel’s Tinker environment.
First, let’s discuss what Laravel Tinker is. Tinker is an interactive command-line tool that is included with Laravel. It allows developers to interact with their entire Laravel application from the command line. This includes working with the Eloquent ORM, jobs, events, and other parts of the application. For developers, this can be an extremely powerful tool for debugging, testing, and managing the application.
Now, let's start the process of manually registering a user. This is particularly useful in scenarios where you need to insert a user directly into the database, bypassing the regular registration process.
Enter the Tinker Environment
If you're implementing authentication using Laravel's approach, you can easily register a new user manually by following these steps:
First, enter the Tinker environment by executing the Artisan Tinker command:
php artisan tinkerTinker is a command line tool that allows you to interact with your entire Laravel application, including the Eloquent ORM, jobs, events, and more.
You will be greeted with a new command prompt. This means you are now inside the Tinker environment.
Insert User Data Using Query Builder
Laravel provides a powerful query builder for working with your database. It allows for fluent and convenient construction of complex SQL queries. In this tutorial, we are using the Query Builder to insert a new user into the users table. Execute the following command within Tinker:
DB::table('users')->insert([
    'name'=>'test',
    'email'=>'[email protected]',
    'password'=>Hash::make('1234')
])
Here, we are inserting a new record into the users table with a username of ‘test’, email address of ‘[email protected]’, and a password of ‘1234’. Note that passwords should be hashed, and Laravel provides the Hash facade for this purpose.

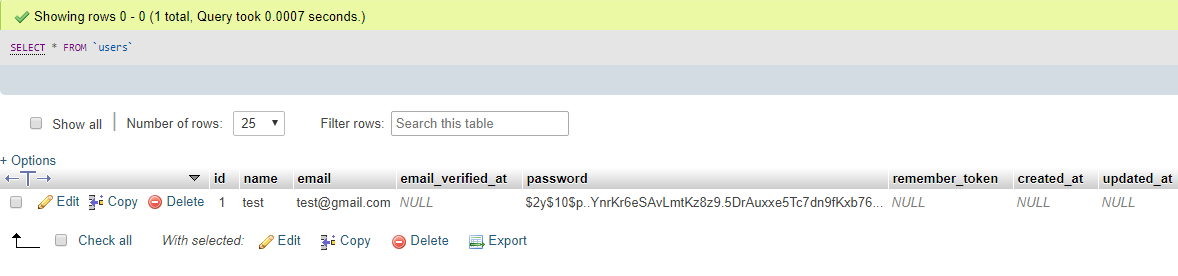
Verify the Insertion
To ensure that the data was inserted correctly, you should check the users table in your database. You can do this through a database management tool such as phpMyAdmin or through Laravel's database migrations if you are using them.
Now, you can check the users table, and the new user should be there.
Conclusion
This method is highly useful, especially during development and testing phases, as it allows you to manipulate data directly. It is compatible with Laravel versions 5.x and 6.x. However, when working with user data, always be cautious and ensure that you are adhering to security best practices.
In conclusion, Laravel offers an intuitive and powerful set of tools for handling authentication. Whether you are an experienced developer or just starting out, Laravel’s authentication features and Tinker environment can greatly streamline your workflow.


Comments