Tripo AI Models: How to Check Blender Rigging and Animation with Claude
AI game development: 52 RPG bosses made with Tripo AI, and how a Blender Python script from Claude checks their rigging, animation, and textures frame by frame.
I'm making a game with AI. In my last post, I tested AI 3D modeling: I used Tripo AI (often called Tripo 3D) to turn the statue monster's concept art into a 3D model, then used a Blender script to reduce polygons, rig it, and animate it. That was just one monster. Since then, I've run every chapter's boss in the RPG I'm designing through the same pipeline: 52 of them in one go.
Only after finishing did I find the real problem. Every one of them looks great standing still. But swing a weapon or land a heavy attack, and a long smear of color stretches out of the shoulder, a fist twists too far and shows its cut edge, and the original patterns get flattened into blobs of color. 52 bosses, five or six animations each, dozens of frames per animation. Scrubbing through them frame by frame in Blender by eye was never going to work.
So Claude Opus and I built a "boss check pipeline": first, code measures frame by frame where a Tripo AI model breaks once it's rigged, then it renders the worst frame as an image for me to look at. In this post, I'll walk through the whole thing using the chapter 8 boss, the Spore Scout.
The example boss: Spore Scout
The Spore Scout is a 2.4-meter-tall, lanky mushroom. Its pointed orange cap has three yellow eye-spots, and under the cap is a squinting, sly grin. It wears a short moss-green cloak, carries a carved wooden spyglass on its back, and holds a crooked walking stick with a small lamp in its right hand.
Concept art: Claude designs from the story, Codex draws
I asked Claude to read each chapter's story and design a boss that fits that stage. Then it writes the prompt on its own and hands it to the Codex CLI, which calls gpt-image to draw it, with an existing game character attached as the style reference. The Spore Scout shows up in the forest chapter, leading a squad of mushroom soldiers, so Claude designed it as a lanky mushroom scout whose cap eye-spots seem to watch everything around it. This is the prompt it wrote:
Character: SPORE SCOUT (孢子斥候), a 2.4 m forest boss: a tall thin long-legged mushroom scout that leads mushroom soldiers; eye-spots on its cap.
A tall lanky chunky KayKit-style mushroom: a tall narrow conical cap in rusty orange with three big painted eye-spot markings (rings of yellow around black dots), a long thin pale stem body with a sly face (two small glowing yellow eyes and a narrow grin), long thin arms and long stilt-like legs ending in flat root feet. Gear: a scout's short hooded cloak in moss green over the shoulders, a leather bandolier strap with buckles, a spyglass of carved wood strapped on the back, wrapped leather cloth bands on the shins, holding a long thin walking stick with a small glowing spore bulb in one hand down at its side.
Every prompt Claude writes has three layers: first, one sentence on who the character is, how tall it is, and what it does in the story; then its look (cap, body, face, arms and legs); and last, its gear (cloak, strap, spyglass, shin wraps, walking stick). The more specific it is, the fewer images Codex has to redo, and later, when I compare the model against it, I have a list to check item by item.
I barely touched any of this myself. Most of my time went to review: does the design fit the story, does the image feel right, and if not, I ask it to change things.
All these prompts are saved as files on the preview page I'll get to below. Each boss card has a "prompt" link, so I can always go back and see what I originally asked for.
It's a great example because it has every kind of trouble you could want:
- Thin limbs: when the arms and legs bend, the thin parts tear most easily.
- Walking stick: a weapon has to stay in the hand, turn with the fist, and never pass through the body.
- Big cap: the cap joins a thin stem, so when the head tilts, the seam can split.
- Lots of small details: eye-spots, the X stitches on the shin wraps, strap buckles. These are the first things to vanish during polygon reduction and coloring.
Check 1: Put the GLB file next to the concept art
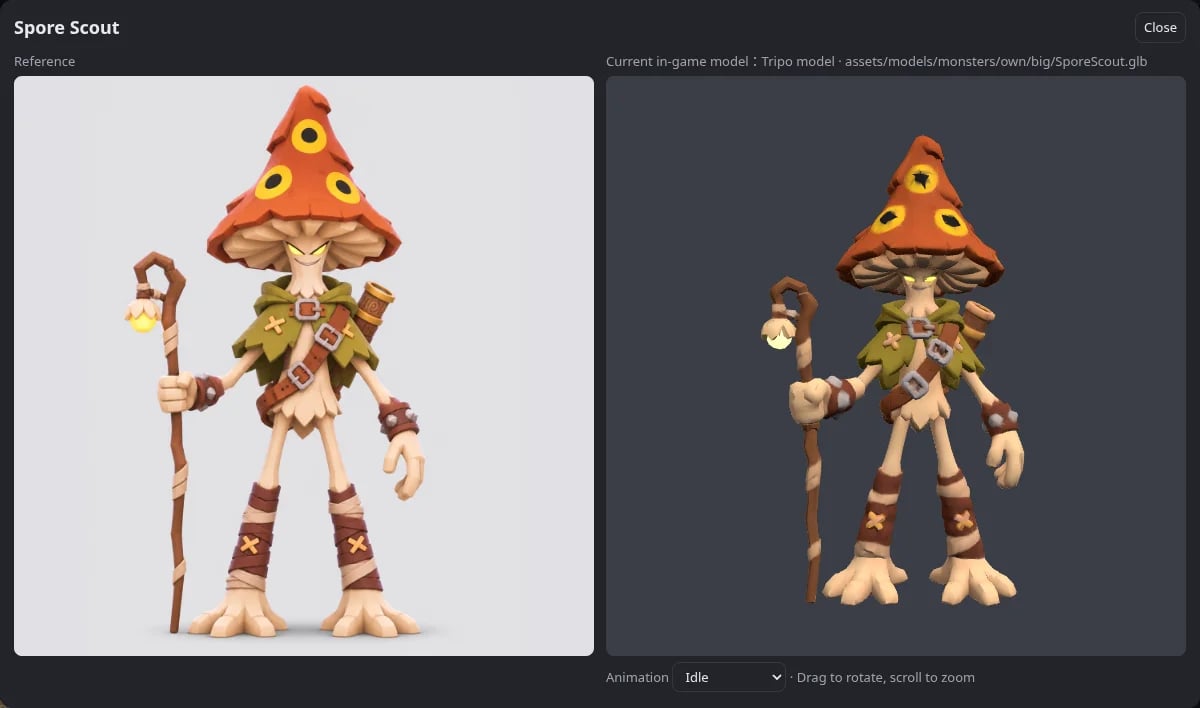
The first check is the simplest, and the one people skip most: look at the concept art and the finished model side by side.
I had Claude Opus build a web comparison page (it loads GLB files with three.js). On the left is the concept art I gave Tripo; on the right is the 3D model the game actually loads. A dropdown switches between idle, walk, attack, heavy attack, hit, and death, and you can rotate it with the mouse. All 52 bosses are on the same page, one click to open, so I don't have to launch Blender every time.
This check is about the big picture:
- Silhouette: are the proportions, height, and cap shape right?
- Accessories: are the cloak, strap, spyglass on the back, and lamp on the stick all there?
- Weapon: is the stick held in the hand, and does it pass through the body when swung?
- Glow: do the eyes and the lamp still light up?
Check 2: Blender rigging and animation, key frames from every angle and every animation
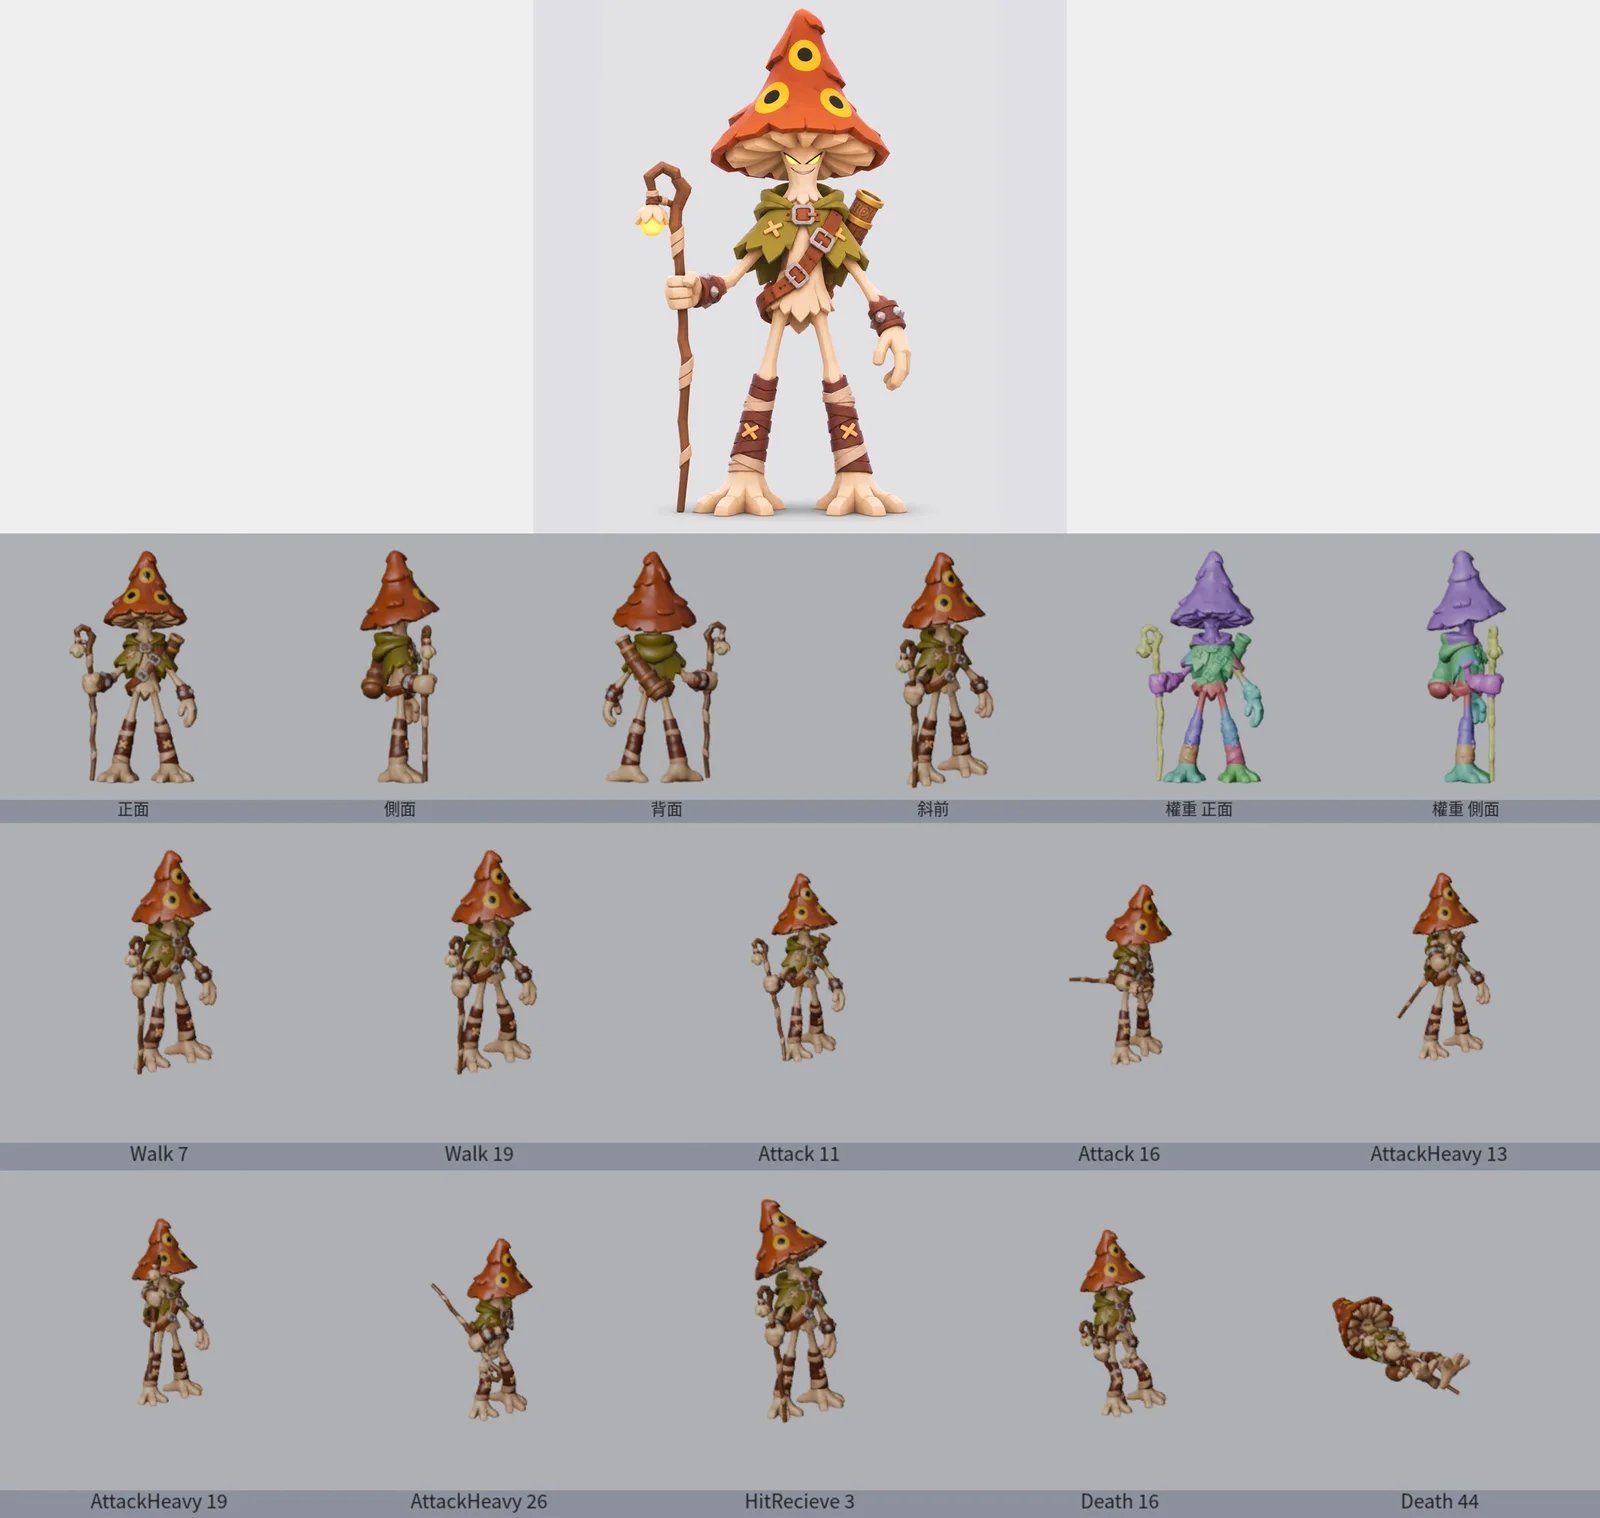
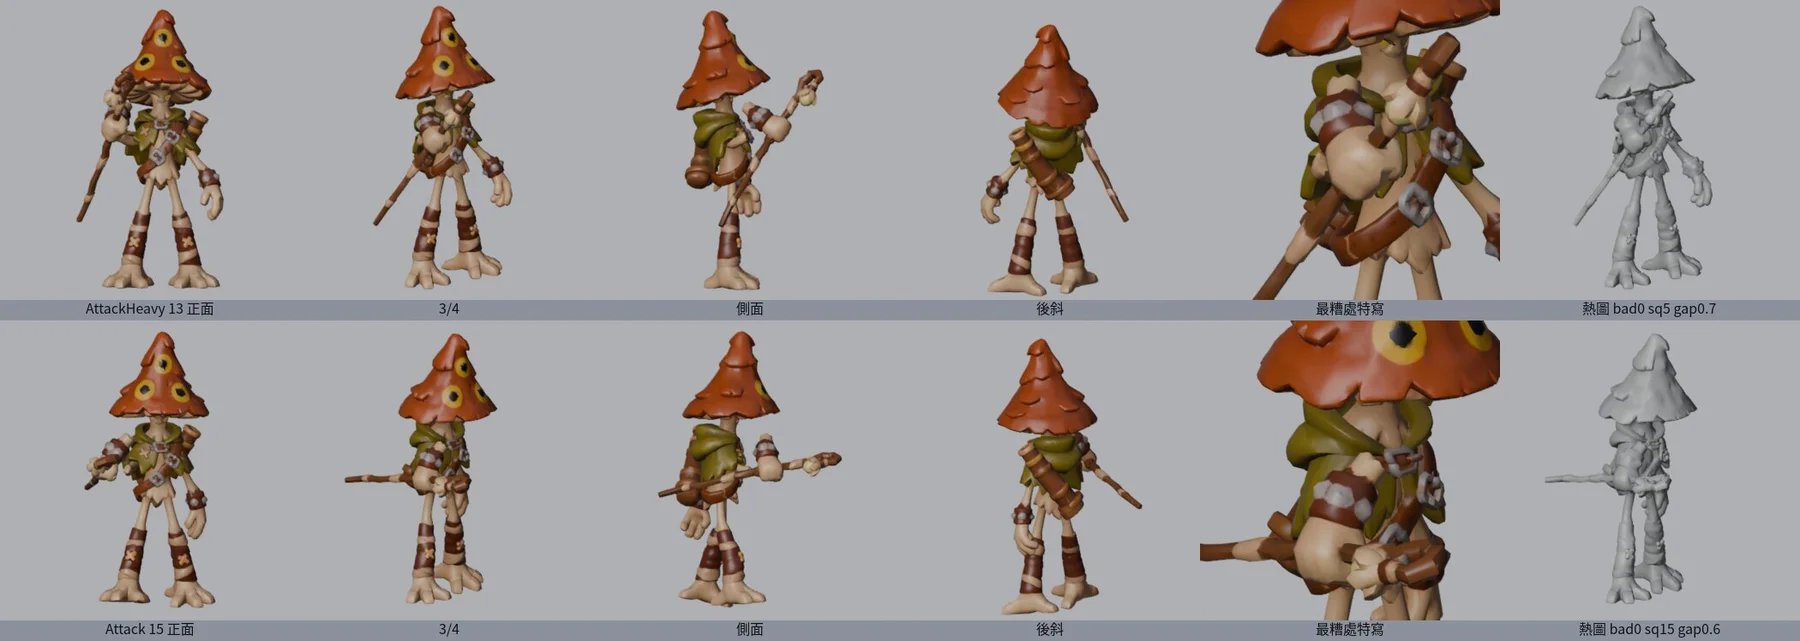
The comparison page is good for "does it look right," but problems in the middle of an animation often flash by too fast to catch. So every time the Blender script rebuilds a model, it also renders an overview sheet:
- Four angles: front, side, back, and front three-quarter, to make sure the back and sides are complete too.
- Blender weight maps: one color per bone, showing which bone moves each part of the mesh. The color borders should sit on the joints. If the arm's color spills onto the chest, the chest gets dragged along when the arm goes up.
- Key frames: a few of the most forceful frames from each animation, like the forward point in the attack, the stick raised beside the head and circling in the heavy attack, and the cap hitting the ground in the death.
One image shows every animation of a boss, which is much faster than dragging back and forth on the Blender timeline.
Check 3: Have Claude write a Blender Python script to measure what breaks, frame by frame
Looking at images still misses things, so the third check goes to code. I just asked Claude to fix it, and it wrote a Blender Python audit script on its own. It opens the model, runs every frame of every animation, compares each one to the rest pose, and measures these problems:
What it measures | What problem it means |
|---|---|
Torn edges | An edge stretched several times longer, which shows up as a smeared band of color or a spike |
Pinching | A face squeezed until it has almost no area, common on the inside of joints |
Flipped faces | A face turned inside out, which shows up as a hole in the game |
Opened seams | The gap between a cut-off part (fist, weapon) and the body gets wider |
Bone rotation | A bone turns more than 110 degrees, which usually means the animation is overdone |
After measuring, the script picks the worst frame and renders it from four angles (front, 3/4, side, rear three-quarter) plus a close-up of the worst spot. The last image is a heat map: the redder the area, the worse it's stretched. One look at that image tells me whether the problem is in the shoulder, the wrist, or under the cap.
There's also a threshold: if any frame of the attack or heavy attack has more than 8 torn edges, more than 30 pinched faces, any vertices no bone moves, or floating bits detached from the body, the script won't export the GLB. A broken model never makes it into the game, so I don't have to find out while playing.
The Spore Scout's first audit:
- Fists: when swinging the stick, the fist turned 150 to 180 degrees, and the cut between the fist and the arm showed.
- Death: the cap tilted too far as it fell, the ring of thin stem under the cap pulled open, and there were 6 torn edges.
The fix was to put a "joint ball" in the fist joint, so when the fist turns too far, the cut shows a ball, like the joint on an action figure, and to halve how far the cap tilts during the death. After the fix: attack 0 torn edges, heavy attack 1, death 0, and idle, walk, and hit all 0. It passed.
Check 4: Backface culling, hunting for holes from behind and up close
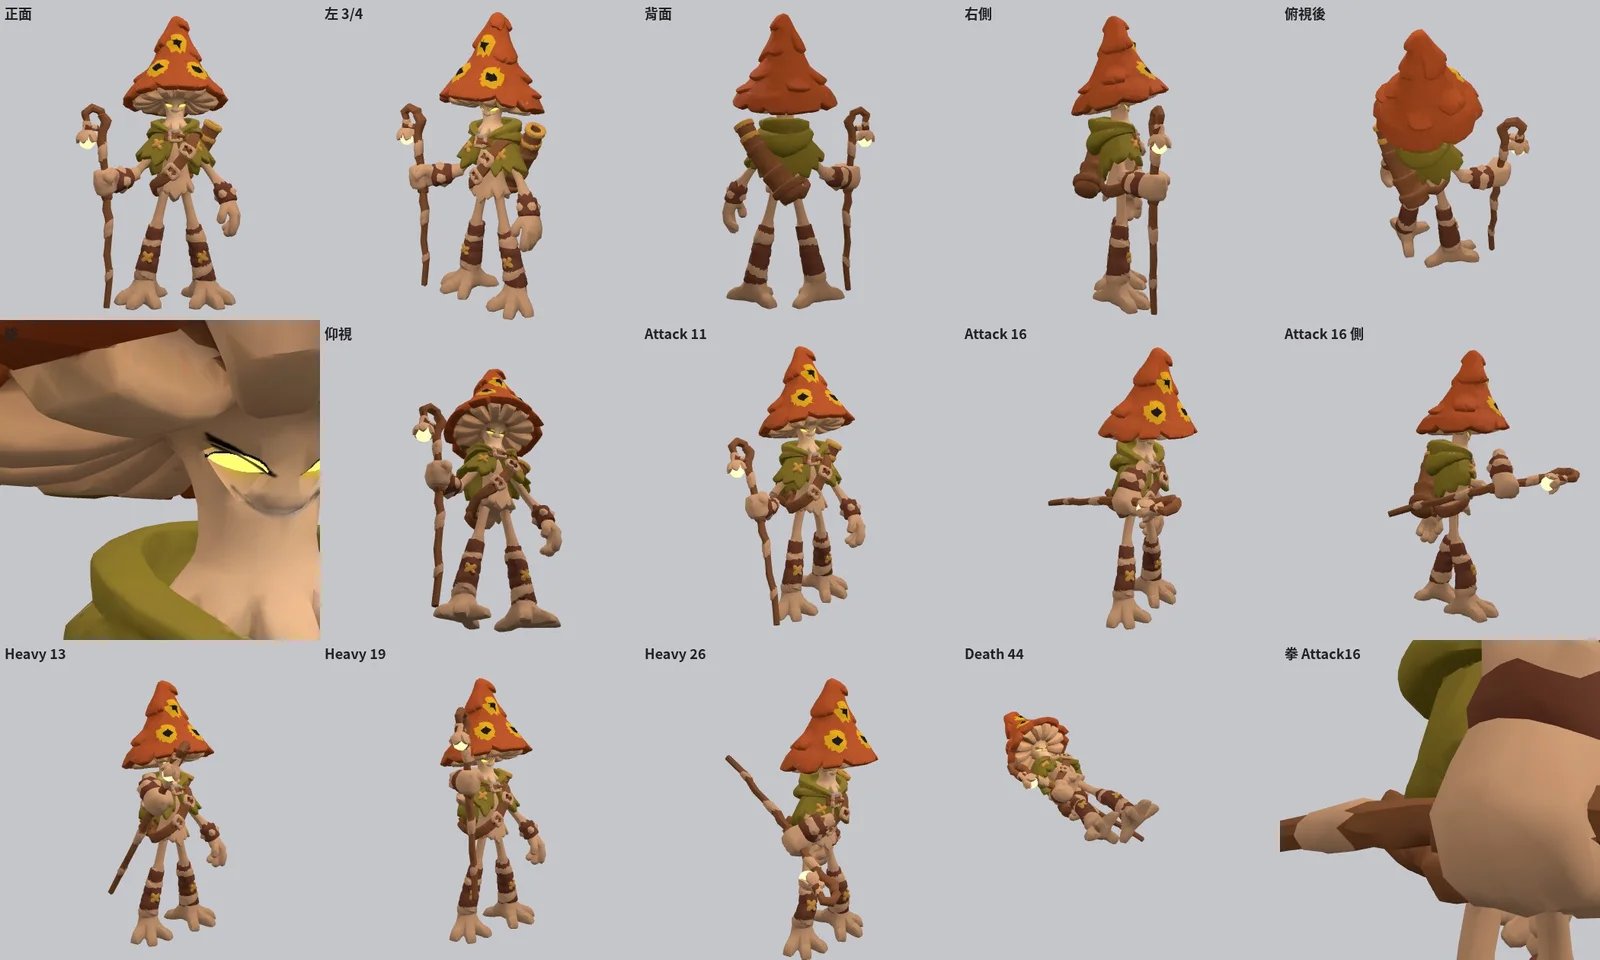
For performance, games only draw the side of the mesh that faces outward. A model that looks complete in Blender can turn out hollow from certain angles once it's in the game.
So another sheet turns on "backface culling" and renders the way the game does: front, side, back, top-down, low angle, plus close-ups of the face and fists. The low angle matters a lot, because the gills under the cap and the seam on the thin stem are rarely on camera. If there's a hole there, it'll suddenly give itself away in some cutscene.
Check 5: Texture baking, does Tripo's 4K texture still match the concept art?
The first four checks are about "shape." The last one is about "color."
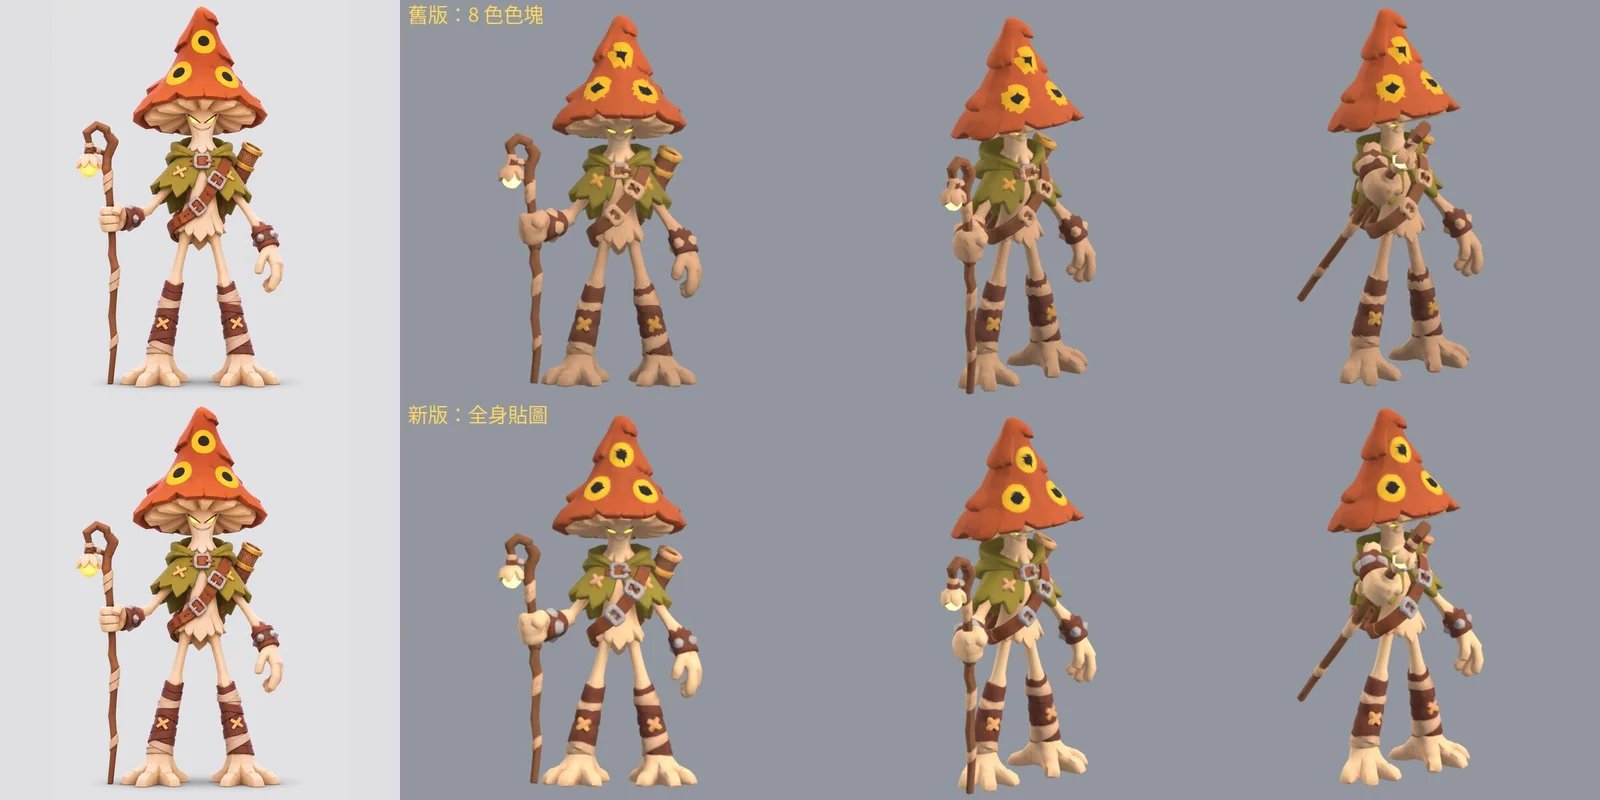
Models generated by Tripo AI come with a 4K texture full of detail. But to keep the models light, my first pipeline reduced each boss's colors to 8 flat blocks. The result: the eye-spots on the cap became a yellow blob, the X stitches on the shin wraps disappeared, and the strap buckles smeared into one patch.
Version two switched to a "full-body texture": the reduced model gets new UVs in Blender, and every pixel looks up the nearest point on Tripo's original model and takes its color. In effect, it bakes the 4K texture's detail back in. In the image above, the top row is the old color blocks and the bottom row is the new version. The black pupils in the eye-spots, the stitches on the shin wraps, and the buckles on the cloak are all back, almost identical to the concept art on the far left.
The cost is 0.2 to 0.5 MB more per boss. The Spore Scout went from 1.19 MB to 1.56 MB, still light on a phone.
Common Blender rigging problems and how to fix them
After one round of audits on all 52, the problems came down to a handful:
Problem | What it looks like | Fix |
|---|---|---|
Joint blend too narrow | Turn the arm, and a band of color gets pulled out of the shoulder | Let the rig's weights blend gradually around the joint, and add a "twist bone" to share the rotation |
Rigid zone too wide | When a helmet or a flagpole on the back moves, the zone's edge splits | Narrow the zone and leave a little falloff at the edge |
Armpit weighted to the waist | Raising the arm, the armpit gets held back by the waist | Move the center of the waist blend lower |
Fist cut showing | The fist turns too far and you see the cut surface | Put a joint ball in the joint |
Leftover bits after raising the arm | Body fragments the arm used to cover pop out | Delete the leftover bits under the arm after rigging |
Details flattened by color blocks | Patterns, stitches, and rivets disappear | Switch to a full-body texture |
The order of fixes matters too: adjust the cheap things first (zone size, blend width), then the expensive ones (animation range, re-cutting parts). Some fixes look reasonable but make things worse. For example, marking more parts as rigid adds a ring of hard edges, and the torn edges went from 4 to anywhere between 17 and 51. So after every change, rerun the audit and let the numbers decide.
After this round of fixes, all 52 bosses passed the threshold: 30 with no torn edges at all, and the other 22 with only 1 to 3 left, which you can't see from the game camera.
Problems you can avoid before generating with Tripo AI
A lot of problems can be avoided before anything goes into Tripo. I gave Claude these rules, and whenever it writes a prompt for Codex to draw the concept art, it always spells them out:
- Front-facing pose: humanoids in an A-pose with both feet flat; four-legged monsters standing on the ground face front, at most 15 degrees off. Only floating aquatic creatures use a 3/4 angle.
- Weapons don't block the body: long weapons like a stick or a ruler stand at the side, not across the chest. Otherwise Tripo fuses the weapon and body into one piece that's hard to separate later.
- Make floaty things solid: Tripo turns drifting smoke and hair into a solid lump. I change them to short curls of smoke pressed against the body, and leave the real smoke to the game's effects.
- Patterns can't look like text: buckles, badges, and engravings can't look like letters or numbers. AI-generated fake text looks really out of place up close.
- One character per image: throw in a whole design sheet and Tripo makes all three into one model (I learned that in the last post).
My boss check pipeline
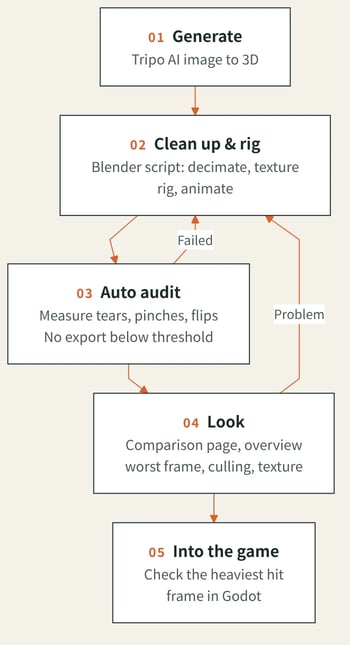
I boiled it down to a checklist that every boss goes through before it ships:
- Compared to the concept art: silhouette, accessories, and weapon are all there; the weapon is held in the hand and doesn't pass through the body.
- No torn edges in any frame of idle or walk (they play constantly, so they're the most visible).
- Attack and heavy attack: 8 torn edges or fewer per frame, aiming for 0 to 3.
- At the most forceful frame of the heavy attack: no stretched bands of color or spikes on the shoulders, armpits, elbows, wrists, or neck.
- No fragments poking out of the sides of the waist after raising the arms, and no small bits floating in the air.
- No holes with backface culling on, especially from behind, from below, and in close-ups.
- Texture: patterns, stitches, and rivets are visible, and the colors match the concept art's palette.
- Glowing parts like the eyes and lamps still glow.
Wrap-up: let AI measure, let people look
Generating 3D models with Tripo AI is fast: a boss is done in a few minutes. What really takes time is the part after that, making sure it won't break once it's rigged and dropped into a 3D scene in Godot. My approach is to split the work: anything that can be measured goes to code, frame by frame; anything that can't gets rendered as an image for a person to look at. The Blender script Claude wrote shrinks 52 bosses and thousands of frames down to one worst-frame image per boss, and all I have to do is look at it for a few seconds. For me, the best use of Blender with AI isn't sculpting shapes. It's this kind of repetitive check that has to be precise.
If you're also making a game with AI-generated 3D models and you're stuck on rigging or animation, come find me on Threads or X and leave a comment on one of my posts.